
This is for Michael's '96NA. Stillen instructions mentioned a few items that apparently aren't on the '96: air injection hoses on the 'down pipes', & a cross member holding these pipes in.
Special tools:
Snap-On part number YA8875 'Compact Oxygen Sensor Wrench'. I used to use a plain 22mm crow's foot socket, but it just doesn't cut it & lead to more frustration than anything. I was told there is an alternative to the S-O piece. I looked at 2 Pep-Boys around me with no luck, maybe they are available in certain stores. The part is made by Performance Tool, and the number is W84008. It is the same as the S-O, and only $9.99.
14mm Gear Wrench
14mm stubby wrench
Timing:
The only timing for installation I could see is to co-ordinate it with an oil change. The oil filter must be removed during the installation, allowing all the oil to drain from the block anyway.
Part Numbers:
14036-30P00 exhaust manifold gaskets (2 req'd)
15239-89E00 oil filter bracket to block gasket
Procedure:
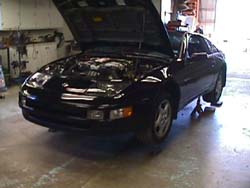
1. Get the car in the air, about 16-18". Make sure all jackstands are properly placed, & all safety measures are taken. (3.) A lot of time will be spent under the car.
2. Drain the oil & drop the oil filter.
3. Remove the bottom catalytic converter shielding.
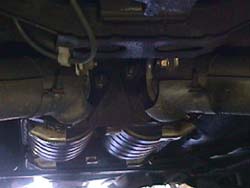
4. Unbolt the rear of the front exhaust pipes (4.) from the cats (4x17mm airwrench), unbolt the same pipe piece from the manifold (6x14mm airwrench). This leaves the front pipes hanging by a stud & a hanger on the transmission. Unbolt it (2x12mm wrench) to drop out both pipe pieces. Penetrating oil will probably be required to get things broken loose. 'Blaster' has been recommended for my future use. Spray it on the EGR connection, the O2 sensors & the manifold/block studs too.
5. Unbolt the steering u-joints, remove the lower & loosen the upper. (2x12mm wrench)Make sure not to move the plastic indexing piece on the lower. The u-joint should come off the bottom set of splines & hang down.
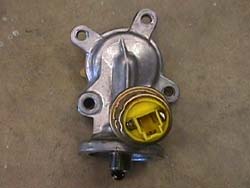
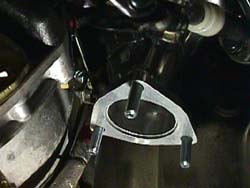
6. The oil filter should already be off, unplug the pressure sender & move it out of harm's way. (5.) Remove the mounting bracket from the block (4x12mm socket).
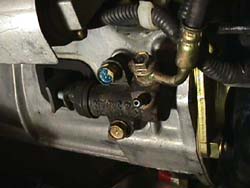
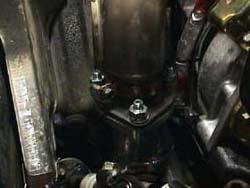
7. The Stillen instructions mention "remove starter motor. Do not disconnect the starter but allow it to hang temporarily." I'm sure what they were talking about is the clutch operating cylinder on the transmission (2x14mm deep socket). Remove it & swing it over to the frame rail, also out of harm's way. (6.)
8. Remove the battery.
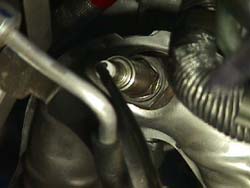
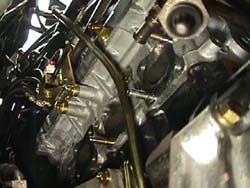
9. Trace the wires on the O2 sensors & unplug them. Using a 22mm open ended O2 sensor socket listed above, carefully remove the O2 sensors from the manifolds. (7.)
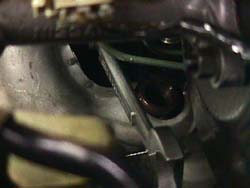
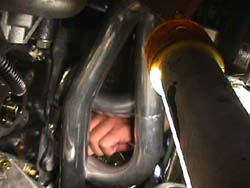
10. Remove the EGR fitting on the left manifold (1x22mm open end wrench). It'll take multiple turns to get it loose. The pipe itself will stay lodged in the manifold until you remove the whole assembly. Get to it from under the brake master cylinder & push the wrench carefully down between the brake lines. (8.) This arc is a large enough to make the nut turn a 6th at a time...
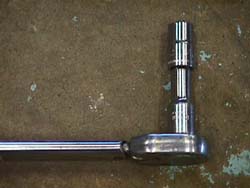
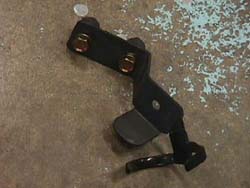
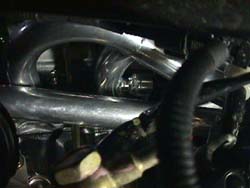
11. Unbolt the manifolds from the heads (12x14mm) The tops can be removed from above w/ a socket wrench. Takes a little creativity to get the best angle. A 1/2 drive 14mm socket on a 2" extension for my torque wrench (9.) got most of the job done. The very front nut on the left side required a 4" extension. The very front nut on the right side is blocked by a bracket that holds a wiring harness (10.) with no less than 3 different types of fasteners in a 3" distance... Remove the bracket & swing the wiring harness out of the way (2x12mm socket), stick the socket & extension on the nut, (11.) then stick the handle long ways from the back of the block under the wires & hoses to the extension. (12.) The bottoms require a wrench with cheater bar option. (13.)
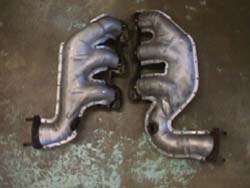
12. With all the nuts & washer off, the manifolds can come out of the bottom of the car. More than likely, a few studs will back themselves out of the block, don't worry. To reinstall them, stick the flat part of the stud in a vice, careful not to ruin the threads, remove the nut. Use the two 17mm nuts from the rear of the front exhaust pipe to 'jam-nut' the studs back in. Place one nut on the stud, then run the other against it with a set of wrenches. Then use the top nut to drive the stud back into the block. Un 'jam' the nuts using two wrenches & back them off. Simple! The EGR tube will have to be pried out of the left manifold to allow it to be dropped. Be very careful not to kink the tube.
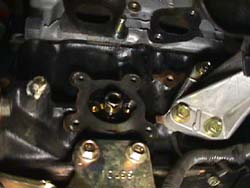
13. Once both manifolds are out, remove the gasket/gasket residue from the block by carefully scraping with a putty knife. Be sure not to scratch the gasket mating surface. After the surfaces are smooth to the touch, install the new gaskets. The dipstick tube on the left side will have to be unbolted in order to get the gasket on the face of the block. (14.) The header will fit around it.
14. Apply anti-sieze compound to all the studs, O2 sensor threads, & EGR fitting.
15. Install the O2 sensors on the headers. Torque to 30-44ft.lbs. The fittings on the old manifolds will have to be carefully removed if they stuck to the sensors during removal. More vice time...
16. Carefully reposition the headers on the studs. Be very gentle with the O2 sensors & wiring during this step. It can be done w/ the sensors in place. The EGR tube will have to be moved in order to get the left header in place.
17. Snug down all the nuts from the center studs outward. Then come back & torque them to 25ft.lbs. from the center outward again. (15.)
18. Route the O2 sensor wires back to their original position. Plug them back in.
19. Tighten the EGR fitting. Once again, this will take some time at a 6th of a turn each pass. Fortunately, the Stillen fitting isn't as deep, so it takes less time to get it seated snugly. (16.) Torque to 25-33 ft.lbs.
20. Reconnect the steering u-joints, torque to 17-22ft.lbs. Make sure the top bolt gets tightened too!
21. Clean off the gasket residue from the oil filter bracket gasket, again being careful not to scratch the mating surfaces. (17.) Put a thin coat of oil on the gasket before using it. Fasten the oil filter bracket back to the block. Torque to 12-15ft.lbs. Fill up the new filter with oil & install it. Also reconnect the sender unit.
22. Reinstall the clutch operating cylinder to the transmission, torque to 22-30ft.lbs.
23. Using the bag of hardware provided by Stillen, put a washer on each bolt, then drop them into the header flanges. (18.) I wish I had welded these in place before installation. The Stillen hardware is 17mm for both nuts & bolts.
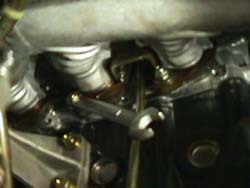
24. Put the header/exhaust gaskets on the exhaust pipes. Put the exhaust/catalytic gaskets on the exhaust pipes. Hang the pipes staring at the studs on the cats. The hanger brackets on the transmission go on top, not bottom, where they naturally want to be. Put a nut on the cat's top stud to hold the pipe in place. Then stack the washers & lock washers on the header flange bolts, and snug up the nuts behind them. (19.) Torque them to 40ft.lbs. It's a tight fit to get a 17mm deep socket on the flange bolt closest to the starter, but can be done.
25. Get the exhaust hanger bolts back in place, then bolt up the exhaust all the way to the cats. Install the lower cat heat shield.
26. Reinstall the battery.
27. Finish the oil change.
28. Fasten the wire harness bracket to the block again. Then strap down the harness with all 3 fasteners.
29. Apply Stillen sticker to front cross member. (20.)
30. After a few days of use, re-torque all header bolts. The flanges will settle in after being through a few thermal cycles.
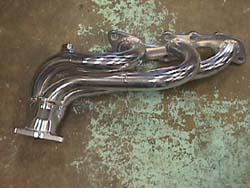
Quality:
Polished mild steel with ceramic coating, very nice. These are set #35 of Stillen's production, so I'll give them benefit of a doubt on future quality. The only downside I saw was the work done at the head flange. The welds weren't filled & ground down at this junction. Unwanted turbulence is the result. For the amount of money spent & the reason this product exists, this shouldn't be an issue. I could have spent the time to do this, but the ceramic coating would have to be removed to do it. Along the lines of welding in the bolts on the flange. Just my $.02...
In a nutshell: if I had to do it all again after the crash, I would have:
1. Gotten a '95
2. Done the intake
3. Done the ECU
4. Done the exhaust
5. Done the underdrive pulley
6. Done the headers
After the headers were installed, I did notice an increase in torque at certain points of the power band (3500 and 4500 rpm???). But I'm anticipating how much help the exhaust is giving me in conjunction w/ the headers -- we'll find this out on ADDIII.
As for my advice for a yeah or nay to install them: they were the most expensive mod thus far. I would do it only if I had the funny money to. Otherwise, I would just stick w/ intake, exhaust, ECU, and underdrive pulley.
Dyno chart (no comparison to stock '95 as the '96 is minus variable valve timing & we're still looking for a stock '96 NA to ride the dyno for a real comparison)
© Twin Turbo Zs of
Dallas - All Rights Reserved 1998
2.
3.
4.
5.
6.
7.
8.
9.
10.
11.

12.

13.
14.
15.
16.
17.
18.
19.
20.